Thursday, December 26, 2019

energetske kuglice/ bliss balls

Kuglice
Loptice
Bonbons
Sirovice
Orašice
Zalogajčići
Enerdžajzerice

PRECIOUS BALLS


Oblika kuglice, loptice, umotane u papir izgledaju kao bombone, od sirovih namirnica pravljenje, pune orašastih plodova, konzumiraju se u zalogaju i pune su energije (oko 376560 džula po kuglici).
U eri treninga, dizanja utega, vitog tela i pucanja od zdravlja. Za pohvalu termički netaknutoj namirnici, sirovoj revoluciji, pogubnosti belog šećera, predstavljam vam kuglice!

Za 30 kuglica potrebno je:
100g badema, mleven
100g oraha, mleven
50g lešnika, mleven
130g urmi, sveže, bez koštice
100g šargarepe, oguljena, narendana na sitno
mleveni cimet, pola kašičice
prstohvat soli
vanila, 3-4 kašičice
muškatni oraščić, četvrt kašičice   

120g crne čokolade, 74% kakaa
maslinovo ulje, pola kašičice
 
U blenderu prvo sameljite urme. Urmama dodajte sve ostale sastojke (osim čokolade) i miksajte dok ne dobijete kompaktnu masu. Smesu prebacite u činiju i ostavite u frizideru 7-10 minuta. Uzmite pleh veličine koja može da stane u zamrzivač. Obložite pleh papirom za pečenje. Izvadite smesu iz frižidera i kašičicom zagrabite smesu i formirajte kuglicu. Redjajte kuglice na pleh i kada izvaljate poslednju kuglicu stavite pleh u zamrzivač da se kuglice stegnu i ohlade dok se čokolada otopi na pari, najviše 20 minuta.
Naseckanu čokoladu otopite na pari. Dodajte par kapljica maslinovog ulja, promešajte. Izvadite kuglice iz zamrzivača. Sačekajte minut dva da se čokolada prohladi i lagano viljuškom umačite kuglicu po kuglicu u istopljenu čokoladu. Nemojte da nabadate kuglicu, samo je lagano prihvatite viljuškom i zaronite u čokoladu, izvadite je i višak čokolade će se sliti niz rešetku od viljuške. Redjajte kuglice obložene čokoladom nazad u pleh. Kada uvaljate poslednju kuglicu odložite pleh u frižider da se čokolada stegne.
Rok trajanja kuglica u frižideru je do dve nedelje, a mogu i da se zamrznu i tako produže život.

Nije varka, ove kuglice su savršenog ukusa plus izgledaju isto tako savršeno. Tanki omotač od čokolade ih štiti od isušivanja i hrska prilikom zagriza. Šargarepa daje boju, svežinu i slatkoću kuglici. Za ovaj recept ja sam kupila karotu, slatku šargarepu. 

__________________________________________________________________________________

Bliss balls
Energy balls
Bites
Rawies 
Nut balls
Date balls
BonBons
Vegan balls

PRECIOUS BALLS


Ball shaped, wrapped in paper look like candy, made from raw foods full of nuts, consumed in a bite and full of energy (about 376560 joules per ball).

For 30 balls you will need:
100g walnuts, ground
100g almonds, ground
50g hazelnuts, ground
130g medjool fresh dates, without stones
100g carrot, peeled and grated 
1/2 tsp ground cinnamon
1/4 tsp grated nutmeg
3-4 tsp vanilla extract 
pinch of salt 

120g dark chocolate, 74% cocoa
few drops of olive oil

Place dates in a blender and blend them first. Then add all other ingredients, except chocolate, and mix until you have a compact mass. Transfer mixture to a bowl and refrigerate for 7-10 minutes. Take a baking tray that can fit in the freezer. Put the baking paper on a tray. Remove the mixture from the refrigerator and scoop into bites with a teaspoon and roll into balls. Arrange the balls on a baking tray and leave in the freezer for a maximum of 20 minutes. During that time melt the chocolate.
Use a double boiler and melt the chocolate. Add a few drops of olive oil and stir. 
Remove the balls from the freezer. Wait for a minute or two for the chocolate to cool slightly. Dip each ball into melted chocolate and gently place back on the baking tray. After dipping the last ball put the tray in the fridge and leave them to cool and firm up.
The shelf life of the balls in the fridge is up to two weeks, but you can easily freeze them and prolong the shelf life.  


No cheating, these balls are perfect in taste and in their appearance. The thin chocolate coating protects them from drying out and gives crunchiness when you bite. The carrot gives color, freshness and sweetness to the ball. Make sure to always use sweet fresh carrot.


Thursday, December 12, 2019

peas, leeks and dill/ grašak, praziluk i mirodjija

U epizodi zeleno, volim te zeleno.


Lagano nastavljamo tamo gde smo stali. Zvezda ovog posta je smrznuti grašak. Moje omiljeno smrznuto povrće. 
Pre par godina sam imala nezgodu sa prstom i smznuti grašak me je spasio od sigurnog ludila. Satima smo grašak i ja čekali na anesteziiju i medjusobno se stiskali i hladili. Tada mi je bilo skroz primereno da mu posvetim jedan sufle recept i tako mu se bar malo odužim, a on bi zauzvrat još jednom narastao i to na očigled svih. Ali to se nije desilo, tj. taj se sufle nije desio. Desile su se razne čorbe, namazi, variva, testenine i po koje zapinjanje o nogu stola i stolice. 
Danas pripremamo grašak po receptu kraljice smrznutog graška Najdžele (Nigella Lawson).
Po originalnom receptu pileći karabataci se peku zajedno sa graškom. Ovo je izmenjena varijanta recepta, odnosno recept je redukovan i karabataci su izostavljeni.
Svakako treba pomenuti da grašak u ovom receptu ne 'raste', naprotiv, malo se i smanjuje, smežurava, ali ukus je i dalje čaroban.

Grašak iz rerne
Za 4 osobe
900g smrznutog graška (dve kese)
6 kašika maslinovog ulja 
6 kašika suvog belog vina
4-6 kašika vode
2 čena belog luka, narendati
dva praziluka, oprati i iseći na kolutove debljine oko 2-3cm (koristiti svetlo zelene delove)
2 kašičice krupne morske soli
veza sveže mirodjije, natrgati

Grašak iz kese izručiti na pleh i tome dodati sečeni praziluk, mirodjiju (otprilike pola veze). Začiniti sa solju, belim lukom, uljem, vinom i dodati 4 kašike vode. Sve dobro promešati i staviti u prethodno zagrejanu rernu da se peče na 200 stepeni 45 minuta. Nakon 45 minuta izvaditi tepsiju i još jednom sve promešati. Ukoliko vam se učini da je grašak suv dodati još nekoliko kašika vode. Vratiti u pećnicu i peći dodatnih 30 minuta.
Tepsiju izvaditi iz rerne, dodati preostalu svežu mirodjiju i servirati.


Zamrzivač bez graška je tužan.
Zamrzivač bez graška noću plače i zato ispušta razne čudne zvuke.
Uživajte u hladnom vremenu i smrznutom grašku!

Green, I love you so.

Slowly but surely we continue to blog. The star of this post is frozen pea, my favorite frozen vegetable.
Few years back I had an accident with a finger and frozen peas saved me from complete madness. While waited for hours to get anesthesia, me and my frozen peas were squeezing and cooling each other. At the time it was perfectly appropriate to create pea souffle recipe, to pay him back in a way. And pea would rise again, this time in front of everyone. But that did not happen, that souffle recipe didn't happen. Instead, there were various stews, spreads, soups, pastas, and some stumbles over chair and table legs.

Today we prepare peas following the recipe of Queen of the frozen peas Nigella Lawson.

According to the original recipe, chicken thighs are baked together with peas. This is a bit modified version, reduced, chicken thighs are omitted.

It's also worth mentioning that peas do not 'swell or grow' in this recipe, on the contrary, they decrease slightly in volume, shrivel up, but the taste is magical.


Peas from the oven
For 4 people
900g frozen peas (2 packs)
6 tablespoons olive oil
6 tablespoons dry white wine
4-6 tablespoons tapped water
2 cloves of garlic, minced
two leeks, washed and cut into rings about 2-3cm thick (use only light green pieces) 
2 teaspoons of coarse sea salt
bunch of fresh dill, torn into peaces

Place frozen peas on a baking tray together with leeks and garlic. Season with olive oil, salt, add approximately half of the dill and add wine and 4 tablespoons of water. Stir everything well and place in a preheated oven to bake at 200 degrees for 45 minutes. After 45 minutes, remove the pan from the oven and carefully stir peas. Add few more spoons of water if necessary and return to oven and bake for further 30 minutes.

Remove the tray from the oven, add remaining dill and serve.

The freezer without peas is sad.
The
freezer without peas is crying at night and therefore makes a variety of strange noises.

Enjoy frozen season and frozen peas!
  

Saturday, August 17, 2019

carrot soup/ čorba od šargarepe

Juče me jedna žena lažno optužila da sam joj ukrala recept. I to javno. Uputila mi je uznemirujući komentar i nadasve zlonameran. Eto šta mogu učiniti tri žumanca i malo mleka. Totalnu pometnju, bar u mom univerzumu.
Kako ona kaže, 'blatantly' sam kopirala taj sveti recept i besramno ga stavila da ga svi vi vidite i uživate u istom. I još sam se usudila (kao i uvek) da insertujem link originalnog recepta i navedem da je recept njen uz ime bloga. Pa sram me bilo.
Neki teškom mukom u 2019-oj dodju do recepta za puding od vanile u koji se doda malo slatke pavlake, a ja lepo sačekam priliku i to sve prepišem.
Otišla sam pod tuš da to sve zaboravim ali umesto toga zaboravila sam da se istuširam. Mokra i vidno uznemirena i dalje sam bila opsednuta Lijanom, a ona je verovatno za sve to vreme negde tamo daleko u Pocono planinama jahala svog konja.
Samo kad sam se i konja setila, i strasti su se skroz na skroz uzburkale. Stala sam za šporet i napravila čorbu za smirivanje strasti.
Delite ljudi hranu, recepte, a posebno one od kojih vam zaigra srce ili krene slinica na usta :)
 
Čorba od šargarepe (za 3 osobe)
5 većih šargarepa, oljuštrene i iseckane na veće kolutove
manja glavica crnog luka, sitno naseckan
dva čena belog luka, sitno naseckan
jedan manji beli krompir, oguljen i isečen na kocke
jedna manja jabuka (slatka), oguljena i isečena na kocke
800ml vode
so
limun
maslinovo ulje
avokado, svež peršun, rotkvice - kao opcija za poslužiti uz čorbu

Na srednje jakoj vatri u dubljoj posudi zagrejte 2-3 kašike maslinovog ulja, i popržite crni luk oko 5 minuta, da omekša i lagano primi boju. Dodajte šargarepu, beli luk, posolite i pustite oko 7 minuta da šargarepa omekani uz povremeno mešanje. Zatim dodajte krompir i jabuku i nalijte hladnom vodom. Kada prokljuca kuvajte oko 25 minuta na laganoj vatri. Kada je povrće mekano izmiksajte sve u blenderu ili štapnim mikserom. Proverite slanost i dodajte 1-2 kašike soka od sveže cedjenog limuna.
Servirajte uz komade avokada, sveži peršun, listiće sveže rotkvice i pospite sa par kapi maslinovog ulja.

Lagana, umirujuća i nežna.


If you get upset by something or someone and if you don't have a chance for example to ride a horse as a therapy. Don't panic. There is always some other, good, rather cheep solution. Healthy as well. Mother nature involved. Make a super carrot soup for when you need to get calm.

Carrot Soup/ serves 3
5 big carrots, peeled and chopped
one small onion, finely diced
two garlic cloves, finely chopped
one small potato, peeled and diced
one small apple (sweet), pilled and diced
800ml water
salt
olive oil
lemon juice
avocado, fresh parsley, radish optional for serving

On a medium-high heat in a deeper pan heat 2-3 tablespoons of olive oil. Add onions and fry for about 5 minutes, let onions soften and get color a bit. Add the carrots, garlic, season with salt and leave to cook for about 7 minutes, stirring occasionally. Then add potato and apple and cover with water. Once it starts boiling leave to cook for about 25 minutes on low heat with the lid on. When the vegetables are cooked use a stick mixer to blend everything or transfer everything in a blender and blend until all is smooth. Check the seasoning, add 1-2 tablespoons of freshly squeezed lemon juice.

Serve with avocado pieces, fresh parsley, fresh radishes and sprinkle with a few drops of olive oil.

Light, soothing and gentle.


Thank you Jelena and Ivana for support and for being virtually there for me ;)

Monday, August 12, 2019

iceBox cake

p r i v i d


Neki muškarac sa sedim dlakama na bradi stalno kači slike savršenog života.
More, plavo, prozirno, mirno.
Oblačići putuju veselo ka pučini.
Sunce greje kamene oblutke
i topi nam lica kroz male ekrane.
I svi se tada osmehujemo dok se palme njišu u pozadini,
dok gledamo slike koje promiču
brzo
klikćemo da se sve to ponovi
iznova i opet
živimo sretno.

I ne, to nije kraj.
Onda otvorite vrata frižidera i baš na jednoj od polica, na tanjiru stoji parče kolača sa slike.

Ne dozvolite da vas vrućina spreči da napravite ovaj desert.

Nepečeni kolač sa vanila kremom i prelivom od čokolade
krem od vanile:
3 žumanca
3 supene kašike gustina, uvršene
1/2 šolje (100g) šećera
2 šolje (500ml) mleka
prstohvat soli
2 kašičice vanile
2 supene kašike maslaca (30g), na sobnoj temperaturi

U vatrostalnoj posudi pomešati žumanca, šećer, so, gustin i mleko. Staviti na vatru i mešati dok ne proključa. Lagano kuvati mešajuci 4 do 5 minuta. Skloniti sa vatre i umešati vanilu i puter. Gotov krem prekriti providnom folijom (kako se korica ne bi formirala) i ostaviti da se ohladi u frizideru.

šlag:
1.5 šolja (360ml) nezasladjene pavlake za šlag
2 supene kašike prah šećera
kašičica vanile

Pavlaku za šlag lagano umutiti sa šećerom i vanilom i postepeno sjediniti sa ohladjenim kremom od vanile.

400-500g petit beurre keksa
150ml mleka

Keks umakati u mleko u redjati u pleh (38x26x7 cm). Četiri reda/sloja keksa i izmedju krem/fil. Završiti sa keksom (zadnji sloj keks) i preliti čokoladom.

preliv od čokolade:
1.5 šolja (360ml) crne čokolade, seckane
3/4 šolje (180ml) nezasladjene pavlake za šlag

U šerpici pavlaku zagrejati do ključanja. Skloniti sa vatre i dodati seckanu čokoladu. Ostaviti 3 minute i energično mešati žicom dok se ne dobije sjajna i glatka smesa. Preliti preko poslednjeg sloja keksa.
Kolač ostaviti u frižideru najmanje 8 sati, ili preko noći.


Days are bright and sunny.
Deserts are cold and easy. 
No bake recipe.
Don't let the heat stop you from making this cake!

recipe adopted from LeAnne, Lion’s Bread food blog <3

Wednesday, July 24, 2019

strawberry jam, new classic

Spreading last bits of strawberry jam and remembering June.

From the archives/ June, last day.
Few thunder storms. One that woke me up at 2 a.m. and made me sleep on a chair covered with sheets over my head. 
Lots of rain but also lots of strawberries, fresh and juicy, locally grown. 
To many mosquitoes, way to many. 
Allergies, inside and out. 
One dead lemon tree. 
New favorite egg salad, two rotten avocados and few cans of sardines. Boiled purple roots of young beetroots. Sour cherries on a tree. 

It happened just once. The day was hot and night even hotter. I went out to attract all the insects of this city. I drank spirits and felt strong acidity of the wine. Around midnight I rushed towards the apartment. On my way home I saw middle-aged man unsuccessfully riding unicycle. Then I made filo pastry pie with fresh strawberries, sour cream, sugar and bread crumbs.

Strawberries. 
Every day strawberries, mostly eaten macerated in lemon juice and vanilla sugar. One afternoon fragile luxury bites sat on a plate.
Wild strawberries.


I neglected some social events and made batch of best strawberry jam. New classic.


Strawberry jam, the recipe adopted from test kitchen.
1400g strawberries, cut in a half inch (1-1.5cm) pieces
600g sugar
one big apple, Granny Smith, peeled and grated
2 tbsp lemon juice

Place strawberries in a big heavy bottom pan or Dutch oven. Using potato masher start crushing strawberries leaving some chunks. Add sugar, grated apple and lemon juice to the pan. Turn the heat on to a medium high and bring to a boil. Let sugar dissolve and cook for about 30-35 minutes. Stir all the time and make sure to skim the foam off once it starts to form.
It's time for canning. Ladle jam in sterilized jars and put on the lid. Leave to cool before storing in the fridge.

Friday, May 31, 2019

GF pancakes

Rice flour pancakes filled with mascarpone and cream, served with macerated strawberries.
Happy days. 


Simple and special. Few days ago this was served instead of a cake for a birthday lunch. And I saw a girl licked her plate.

Rice flour crepes
Serves 2
One egg (55-60g)
100g rice flour
One cup of milk
Pinch of salt
One teaspoon of sugar
Vegetable oil for frying (about 5 teaspoons, one for each pancake) 

Put flour, salt, sugar, milk and egg in a bowl and whisk hard (this way you will get batter without lumps). I do this by hand but if you wish you can use blender or hand mixer. But some exercise will do you good.  In a pancake pan (20cm) heat the oil. Heat 2-3 teaspoons of oil and then wipe it some off.
Ladle batter into the pan then quickly swirl so that the batter quickly covers the base of the pan in a thin layer. Cook for a minute and flip it and cook for about another minute on the other side, then remove the pancake to a plate.
Continue with the rest of the batter (I get five pancakes from this amount of batter).  
Spread about two teaspoon fulls of mascarpone filling on each pancake and roll it up. Serve with macerated strawberries.

Mascarpone and cream filling
Make sure mascarpone cheese is at room temperature. Place 3 table spoons of mascarpone with two tablespoons of icing sugar in a bowl. Add juice of one lemon and stir everything to combine. Add softly whipped cream (150ml) and mix gently. Fill pancakes with this mixture

Macerated strawberries
Keep strawberries at room temperature. Wash them and remove stems. Cut them in halve or in quarters, if they are bigger, and place them in a bowl. Add splash of vanilla, juice of one lemon, 2 tablespoons of sugar. Gently mix everything with a spoon and leave to macerate for 10-15 minutes.

white sandwich bread with strawberries

I've been eating clouds for days now. 
Fleecy clouds. 
Come, join me! 

Fragile fruits on toasted white bread. Instead of butter and jam. Real Spring hero.


White sandwich bread 
Heavy cream 
Strawberries 
Honey

Toast white sandwich bread till pale gold. Softly whip heavy cream. Generously pile whipped cream on the toast. Add slices of fresh, soft, sweet, strawberries. Drizzle runny honey over the strawberries. Eat.


Tuesday, May 21, 2019

hummus plate and strawberry season


I usually go once a week to farmer's markets to buy all the greens and fruits. This weekend I was mainly focused on strawberries and whether strawberry fields have survived heavy rains and cold weather. I know most of them are under plastic roof tops but still, life was not easy last few weeks for any kind of frailness. Also, I somehow forgot about other foods. Selfish need for locally grown strawberries overcame everything else. It doesn't happen that often, this 'obsession' for certain foods that hits me, but when it does I just let my self go. That means I eat strawberries all day, for breakfast, lunch and in the evening. In the morning I eat them fresh with cooked oats, or with french toast. During afternoon I snack them, sometimes with spoon. Desserts I save for dinner time and spend evenings with macerated strawberries, finger ladies and cream. Fruits must bee at room temperature. It's like picking and eating them right away. I wash them carefully and remove stems. Cut them in halve or in quarters, if they are bigger, and place them in a bowl. Then I add splash of vanilla, lemon or orange juice and few table spoons of sugar (not too much) and leave them to macerate for 10-15 minutes. I roughly crumble lady fingers into the bowl and stir. After I whisk heavy cream until soft peaks form, I generously dollop it on top to cover shiny fruits. Then I dig in with a big spoon! 

I know this post so far is about strawberries and looking at the picture above while reading all written doesn't have much sense, but this way I keep on feeding this mania, passion that I am experiencing. I am powerless to resist, I actually don't want to resist at all.

And regarding the picture above, this lunch we had few days ago. I should say few words about it but actually picture says it all. It's simple, it's beautiful, tasteful, and even gluten free, a colorful weekend lunch plate. No cooking required (boiling eggs not included). You go to the garden, on foot or by bike or by bus. You pick veggies. You pick everything you like, you desire, you crave for and wash carefully and cut. Scatter over a plate, bed of arugula, around hummus and that's it. Then you dig in with a fork!

Arugula bed
Carrot and apple mach sticks
Cherry tomatoes halves and quarters
Finley sliced red onion 
Small radishes 
Avocado + za'atar
Olive oil and lemon juice for drizzle 
Soft boiled eggs (not pictured)
Hummus
can of chickpeas (400g, drained 240g)
1-2 tablespoon ice cold water
2 cloves of garlic (minced)
one teaspoon tahini 
juice of half lemon
4-6 tablespoons of good olive oil
salt to taste
spoon of cream cheese or sour cream optional (for creamier and lighter version)

Place chickpeas and cold water in a food processor and mix until you get almost paste like consistency. I have an old blender so it takes some time but it's worth it. Add all other ingredients and mix again to get smooth paste. Try, taste and add more lemon juice and/or more salt if needed. 

Thursday, May 16, 2019

banana fritters

Till sunnier days arrive


Nigel Slater's banana fritters  
Serves 4 
bananas 4, large and slightly under-ripe
caster sugar for rolling
groundnut oil for deep frying

For the batter:
plain flour 100g
rice flour 50g
baking powder 1 tsp
water 200ml

Combine the flours and baking powder in a bowl and stir in the cold water and beat with a whisk. Scatter a layer of caster sugar over a plate. Heat the oil in a pan. Peel the bananas. Cut each in half and dip them in the batter and place them carefully into the hot oil. No more than 4 halves at a time.
Turn the bananas over as they cook. When the batter is golden remove the bananas on kitchen paper and roll them in the caster sugar. Serve the fritters with the coconut yogurt, as suggested by Nigel Slater, or with chocolate sauce.


Empty streets,
Loud winds,
Summer's sultriness,
Fallen flower petals on the kitchen table,
Concrete walls,
The buzz of fat flies,
Toasted and lightly sticky hazelnuts with the taste of sweet maple and salt,
Cold citrus juices oozing down the chin,
Sizzling oil from the pan at noon,  
Soft baked bananas,
Till sunnier days arrive. 


Thursday, May 9, 2019

granola vol. 2


600g rolled oats 
100-150g coconut chips
400g raw nuts (hazelnuts, walnuts halves, almonds)
2 teaspoons salt
240ml maple syrup 
160ml olive oil

This amount requires two oven trays. And if you are not granola type of person there is no need to make ahead this amount. Simply cut the recipe in half and you will be fine for a week. 
Preheat the oven to 150 degrees C. 
Mix all dry ingredients in a large bowl. Add olive oil and maple syrup and stir well to coat evenly. Spread out the mixture on the prepared tray and bake for about 40 minutes. Make sure to stir once or twice. I follow original advice and check on granola every 15 minutes as it bakes. Once it's evenly brown and coconut chips toasted it's done. 
Allow to cool completely, then transfer the granola to airtight containers. 

Recipe adopted from Molly Wizenberg <3


I made my version only with whole hazelnuts and served it once only with pink grapefruit and fresh orange juice. I usually eat granola with plain yogurt but sometimes I love to serve it only with fresh citruses or berries. Tonight I have made another batch with combination of nuts, whole hazelnuts, walnuts halves and whole almonds. Now I am impatiently waiting for the weekend to grab some fresh strawberries from the market, first of the season, to pair them with granola and coconut yogurt.
You'll be crazy not to try the best granola so far.

You get out of the bed and go to the kitchen. You put the water on to boil for a good cup of tea or coffee. Temperatures are pretty low and we are experiencing winter blues. Most of the days are dark, rainy and cold. Still, mosquitoes are biting. You want to scratch but instead you reach for your best granola and start to nibble. Spring winter blues relief from a jar. Do try!

Thanks again Molly for such a great granola recipe.

Friday, April 12, 2019

pasta with tomato sauce

Hey, It's Friday and I have some nice pasta on a plate for you! 


Who cares if it's cold outside and rainy, as long as you have warm bed and idea what to cook (read full belly) you'll be fine!

Pasta With Tomato Sauce
There are many versions for tomato sauce. Almost all of them have olive oil, garlic and normally tomatoes (fresh, from can, juice, dry, puree). This one is no exception, there is olive oil, garlic, tomatoes (tomato paste and homemade tomato juice) but there is another ingredient, key ingredient, lemon zest. Sometimes I call this pasta penne alla lemon zest, simply because lemon zest dictates the flavor here. It lifts it up to another level. 
It takes 30-35 minutes to make this sauce and I usually cook it before I eat. Therefore I put the water for the pasta to boil once I start preparing the sauce.

Serves 4
ingredients
3 tablespoons olive oil
2 medium-sized onions, finely chopped
3 garlic cloves, finely chopped
2 spring onions, finely chopped
teaspoon sugar
tablespoon tomato paste (concentrate) 
650ml homemade tomato juice
200ml water
one large lemon, zest
tablespoon butter
salt to taste
about 1/2 cup Parmesan, grated
250g penne (You can use pasta of your choice or make your own, fresh pasta. I didn't. Not this time)

Heat the olive oil in a large pan and add onions and salt (pinch or two). Cook onions gently stirring every now and then (not letting to burn) for about 10 minutes. By that time onions should be soft and start to caramelize. Add garlic and spring onions. Stir for another minute or two. Then add tomato paste and cook for minute or two before tipping in tomato juice, water and sugar. Cook uncovered on medium-high heat for 20 minutes. Stir in lemon zest, Parmesan and butter. Take the pan of the heat. Check for seasoning.
Once the water for pasta is boiling add salt and tip in the penne. Cook according to packet instructions. Drain the cooked pasta and combine with the sauce (you can pour sauce over pasta as well). Make sure the pasta is coated evenly with sauce. 

Good to know, this pasta is good cold as well!


Tuesday, April 2, 2019

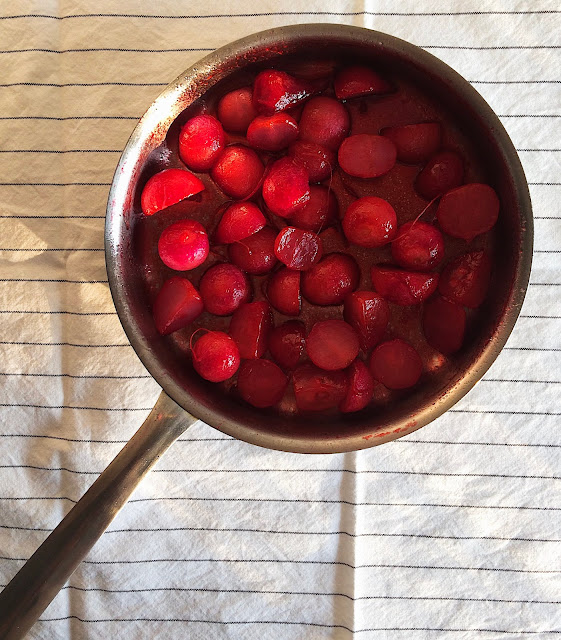
note to radishes

I like to snack you just as you are. I always did. 
In my childhood I remember being the only family member loving you. 
Your pink/red appearance attracted me. 
At the time I would eat you as a bowl of candies before lunch.
Now, I like when your thin slices, almost translucent, get coat with olive oil, lemon, Dijon mustard, honey, apple cider vinegar, sea salt and mix with slices of red onion and green apple.
Yesterday you turned your color to neon pink in a heated pan and now I like you even more. 
Please forgive me for not eating your green tops.
I let them wilt. 


Fried Radishes in Olive Oil with Honey, Lemon and Pink Peppercorns / Caramelized Radishes

2 bunches medium radishes
2 tbsp olive oil
one tablespoon honey
about one tablespoon fresh lemon juice
one teaspoon pink peppercorns
sea salt for seasoning 

Wash the radishes, trim the stem ends, and halve or quarter large ones.
Heat the oil in a frying pan over medium-high heat. Add the radishes arranging them cut-side down in a single layer. Season with salt and add peppercorns, fry for about 2 to 4 minutes, then flip and fry for another 2 to 4 minutes. Add honey and lemon and gently mix everything and roast till the liquid vapors. Check for seasoning.
Serve warm as a side dish.


Wednesday, March 27, 2019

fried egg on everything!

Fried egg on everything?
Yes, well almost everything.
Why? Simply because everything tastes better. 
Every egg person will confirm this.
Eggs on toast, salad (savory), rice, pickles, sandwich, vegetables, greens, bacon.. even yogurt. Yes, with yogurt it creates genius recipe.
Those who love eggs will adore this creation. It's Juila Turshen's genius recipe, olive oil fried eggs with yogurt and lemon. Takes not more then ten minutes to dive into the creamy rich heaven. Yet, very fresh and light, because of fresh lemon juice and fresh herbs. Such a simple but very comforting and innovating way of eating fried eggs. 
Your egg routine just got upgraded!


Serves one
Olive Oil-Fried Eggs with Yogurt and Lemon
60ml plain yogurt (Greek or not, your choice) 
1/2 lemon 
salt 
Freshly ground black pepper 
2 tablespoons extra-virgin olive oil 
2 eggs 
1 tablespoon roughly chopped leafy fresh herbs, such as basil, dill, chervil, chives, and/or parsley


Directions
  1. In a small bowl, combine the yogurt and a big squeeze of juice from the lemon half (don’t discard the lemon half) and whisk together. Season to taste with salt and pepper, and adjust the lemon to taste, too. Scrape the mixture onto a plate and spread and swoop it so the yogurt covers most of the plate.
  2. In a nonstick skillet over medium high heat, warm the olive oil. Crack the eggs into the pan and sprinkle each egg with a bit of salt and pepper. Sprinkle a few drops of water (less than a teaspoon) into the skillet, being sure to let the water hit the bottom of the pan and not the eggs, and immediately, carefully cover the pan with a lid or the bottom of another wide, lightweight pan.
  3. Let the eggs cook until the whites are cooked through but the yolks are still a bit wobbly, just a minute or two. Transfer the eggs to the prepared plate, setting them on top of the yogurt, then pour the remaining olive oil from the pan over the top. Squeeze whatever juice remains in the lemon half and scatter over the herbs. Serve immediately.

Thursday, March 14, 2019

granola bars

Making home made granola is a moment of pure joy and happiness plus it's cheaper and what is even more important you get to chose what goes in. With bars it's the same. More often I make granola but this time I have decided to do bars, milky granola bars to be precise. 
Back in time when I was in school there was just one manufacturer that produced granola bars in three or four flavors. Corn flakes, oats, puffed wheat, dried fruits and nuts in traces, everything glued up with honey. Sticky and sweet memories can be evoked easily, as even now after so many years this same manufacturer produces exactly the same granola bars plus few new flavors. I never liked the one with raisins, I like raisins in general but never with oats. There is one with dried apricots, a classic, and when in supermarket I usually reach out for this one. It's simple and modest. Also there is one covered with chocolate. This one was most wanted as a 'healthy' snack back in school days, which reminds me that I like bites of dark chocolate in granola. 
But to get back to milky granola bars.


I was left with some extra sweetened condensed milk and dulce de leche and used it as a substitute for sugar and oil. 
You get 16 bars, that feed two for a week. They can serve as a breakfast or snack. What I like is to deconstruct it and eat with milk or yogurt, sometimes I catch myself just stuffing it. Also, sometimes when I eat it with yogurt I add fresh berries or fruits. You see all these big chunks, I like that.


Granola Bars
280g sweetened condensed milk
100g dulce de leche
250g rolled oats (not instant)
100g coconut chips, gives extra cunch
100g dried cranberries
40g sesame seeds
80g natural unsalted peanuts
60g raw hazelnuts
good pinch of salt


Oats are a must and all other ingredients you can adjust as per taste. 
Place all dry ingredients in a big bowl and mix it. Add warmed condensed milk and dulce de leche. Put disposable vinyl glove on your hand and mix well everything before you spread the mixture and press down into a prepared tin (23x33cm, oil the tin or cover with parchment paper). You can use wooden spoon or spatula for this but try with gloves, so satisfying. Place in a preheated oven to 130°C and bake for one hour. 
Remove from the oven and, after about 20 minutes, cut into bars. Let cool completely before storing. 

(Recipe inspired by breakfast bars - Nigella Lawson)